Thursday, April 29, 2010

Lime Shortbread with tangy glaze


Well it’s the weekend, Friday is always a little more relaxed until something breaks at the last minute…Does this happen where anybody else works? Seems like a pretty common I.T. thing, and yes I am in I.T. To be specific; I program the telephone system here from my Indigo art covered cubicle. I have been doing this for years; I call myself the “phone girl”.

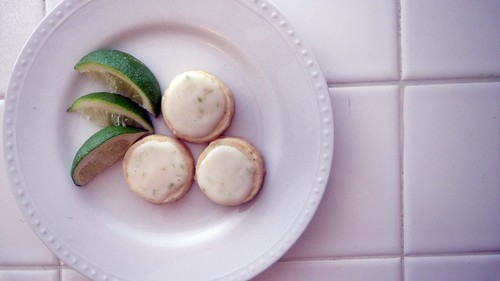
A few days ago a co-worker mentioned his birthday and I asked him what his favorite dessert is, he replied “Key Lime Pie”. My wheels were turning thinking of things I could make with Lime flavor, but dropping the pie portion. You might have noticed the Orange Shortbread I made earlier; since I had shortbread on the brain I decided to make it Lime flavored. This is such a tongue twisting flavor with the citrusy glaze and I hope you enjoy!

INGREDIENTS FOR COOKIES, makes a butt ton of cookies

1 ½ cups of all purpose flour
½ cup powdered sugar
½ cup cornstarch
1 cup butter, softened
1 tbs lime juice
2 tsp of lime zest

INGREDIENTS FOR GLAZE

1 ¼ cup powdered sugar, sifted
1 tsp lime zest
2-3 tbs lime juice

You will want to combine the flour, powdered sugar and cornstarch in medium bowl. Set aside while we work on the rest. In another bowl beat butter at a medium/high speed until creamy. Once creamy add in you flour mixture by using a spatula or if you have a *fancy* mixer turn it down to a very low speed until a dough forms.

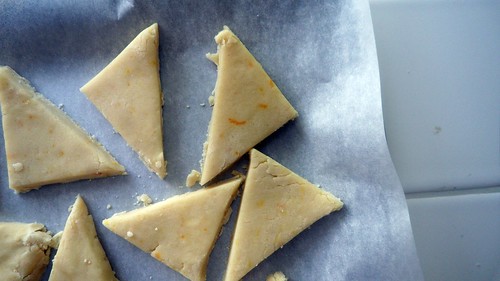
Once dough is formed you will want to divide the dough in half and roll into logs. I then placed it in the freezer for about 20 minutes so I could cut little cookies….like so


These cookies were baked at 350 for about 10 minutes.

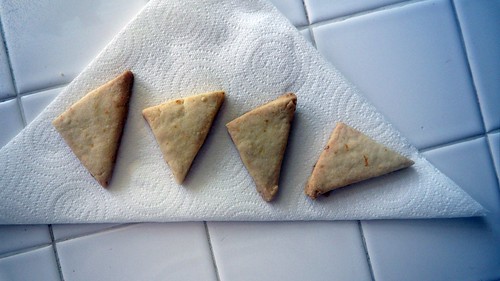
Here are the “naked ones”


If your prefer your shortbread with clothing, make the glaze by combining your powdered sugar, zest & juice with a wire whisk. I then used a small spoon to cover each cookie with a dollop of glaze. You can place your cookies in the fridge so the glaze set’s up or just leave them be for about 30 minutes.

“not naked” shortbread


Enjoy your weekend & happy baking, sleeping, smiling, flower picking, fruit eating, kid chasing, wine sipping & bad tv watching!

Wednesday, April 28, 2010

Banana Cake with Cream Cheese Frosting


Quite frankly there was a good chance of me turning into a banana over the weekend. I was armed with a bushel of them and with Indigo at my side we created some great stuff.

First off this is a super great, yah I said super great…cake. For Indigo’s birthday I want to have a few different flavors of cupcakes and this will for sure be flavor number one. I will be working on the other flavors throughout the next 2 months; I want to be the baker for her 2nd birthday and for every other time that requires a sugar concoction.

Delightfully borrowed from: http://www.evilshenanigans.com/2009/06/banana-cake-with-cream-cheese-frosting/


INGREDIENTS

For the Cake:
1 cup mashed ripe bananas
1 cup buttermilk
2 cups all-purpose flour
1 teaspoon baking soda
1/4 teaspoon baking powder
1/4 teaspoon salt
1 stick unsalted butter, at room temperature
1 3/4 cups sugar
2 eggs
1 tablespoon vanilla

For the Frosting
1 bar (8 oz) cream cheese, soft
1 stick butter, soft
3 cups sifted powdered sugar
1 teaspoon vanilla

DIRECTIONS

Preheat your oven to 350, and grease two 9 inch cake pans. Mash your bananas; then pour your buttermilk into the bananas and mix well. Set this bowl aside.


Sift the flour, baking powder, baking soda, and salt in a large bowl and set aside. In another bowl cream the butter and sugar until well mixed. Add the eggs one at a time and then the vanilla; make sure it is all binded well.


The last step is to combine your wet & dry ingredients together. Once mixed divide the batter into your baking pans, bake for 35-40 minutes.


Now you can make your icing which is as easy as creaming your cream cheese with you butter, then slowly mixing in your powdered sugar.


Once the cakes are cooled make sure to put a big fat layer of icing down the center…and don’t forget the 4 piece parchment liner below your cake – you never have to worry about icing incidents with this. Basically it is 4 slivers of parchment below the bottom layer that you remove after you ice the sides.


The last steps are pretty easy – Remove plate from cabinet, cut cake piece, frantically search for a fork, take a bite….exhale.

Tuesday, April 27, 2010

Warm Shredded Chicken Sandwiches

On the menu last week were some warm shredded chicken sandwiches, that and side of Indy doing somersaults in the back yard. You would laugh your tail off if you saw it. Indy goes full speed ahead and crashes to the ground perfecting her sault…sometimes maybe not so perfect. With each one she yells “TADAAAAAA”, she is just perfectly cute.


Now on to the chicken! This is a warm creamy shredded chicken with a few little touches, feel free to add yours as I am thinking a few more things that might go well in them are diced celery, chives, onions – all that jazz. Below is what my family enjoyed for dinner.

INGREDIENTS Makes 5 large squishy sandwiches, ready for eating.

1 roasted chicken, shredded – mine was 1.5 lbs
1 can of cream of chicken soup
10 Ritz crackers, crushed
½ cup of finely diced red bell pepper
¼ tsp of dry mustard
Bread, we used toasted sandwich thins

DIRECTIONS

In a large skillet over a medium heat add in your chicken, soup, crackers, red bell pepper & dry mustard. Get mixture nice and hot and then top your toasted bread with the mixture. Now that was easy!

Sunday, April 25, 2010

Orange Zest Shortbread


Right now, in my kitchen there are 7 different colors on the wall. They are as follows : Dreamy Blue, Tomato Bisque, Dungeon Blue, Honey Tea, Key Lime Green, Oathill Green & some sorta greenish grey. We are at a loss, we have had no trouble in any other room in our house but the kitchen is totally kicking us in the tail. We were set on Tomato Bisque but some friends came over and put doubt into our minds about having a dark kitchen…you know who you are if you are reading this…

On to the food, how about something super easy? Cool, glad you agree because we are making shortbread. Now don’t ask me why, but it is always the more simple recipes that I always envisioned being the hardest. I totally thought shortbread would require some crazy ingredients or method, but it does not.

This recipe makes 12-15 decent cookies depending on how you cut them.


INGREDIENTS

½ stick of butter, softened
¼ cup of white sugar
1 tbs of orange zest
1 ¼ cup flour

DIRECTIONS

Cream together your sugar and butter. Zest your orange and add it into the sugar & butter mixture. Next add in the flour little by little mixing with a wooden spoon or spatula until the flour is absorbed. Put some patchment paper down on your counter and dump the dough out then bind it by hand. Once binded roll in out into ½ inch thick square. Cut your shortbread into any shape you want and bake at 325 for 20-23 minutes or until the edges on the bottom are slightly browned.


Enjoy and once we decide on a paint color, I will let you know...also Key Lime Shortbread to shortly follow this week...oh yum

Thursday, April 22, 2010

Banana Pop Tarts


Homemade pop-tarts, need I say more? I was taking a cruise via Google; checking in on my favorite blogs and came across the pop-tart. How fun I thought, thinking of future Indigo sleepovers where mom makes the whole crew homemade tarts for breakfast.

So since I got that idea in my head, the baking bug was really biting me. I talked my husband into making them for dinner. Traffic was terrible and we had things to do so I phoned in for the hubster to take the pie crust out of the freezer and pre-heat the oven so that the minute I walked in the door I could make these sweet little things.


INGREDIENTS FOR 6-8 LARGE POP TARTS

2 Pie Crust, or homemade. I used http://indigosugarspectrum.blogspot.com/2010/04/pie-crust.html
3 ripe bananas
3 tbs of light brown sugar
1 tbs pancake syrup
1 egg, whisked
Granulated white sugar for dusting

DIRECTIONS

In a large bowl mash together your bananas, brown sugar & syrup; this is your filling.

Divide your dough into 6-8 large squares, on parchment paper (floured) take one piece and roll out into a large square shape (or close to it) we will cut off the edges so do not worry about being to neat – heck mine looked like small countries… Remember to dust the dough with flour since it should be very thin.

Place two large spoonfuls of your filling onto one side of the dough, then fold the other half over top of it. With a floured fork press down the edges, then with a pizza cutter lop off the messy edge. Sorry for the lack of photos, but sometimes life is just happening to quickly. I know you know what I mean!

Now place that pop-tart onto a baking dish covered in parchment paper. Finish making the rest of your pop tarts. When finished you want to brush each pop tart with the egg wash and sprinkle with sugar. The last step is to cut vents into the top of each tart.

Bake at 400 for 20 minutes, or until desired browning.

“What me take a bite, don’t mind if I do!”

Wednesday, April 21, 2010

Anchovy Cream Sauce Pasta

A few weeks ago at a less than stellar Farmers Market I picked up some Anchovy butter, there were many other choices but this one stuck out to me. It was not overpowering and just something different to try. I decided since I had just recently learned how to make a roux and cream sauce that the light anchovy flavor would be a great base. If you have any flavored savory butters lying around, this is a good base to start with.


INGREDIENTS


6 tbs of anchovy butter (or any flavored savory butter)
5 tbs of flour
2 cups of heavy whipping cream
2 cups of milk, I used whole
1 lb pasta, your choice of shape
2 cups of halved cherry tomatoes
¼ cup capers
1 cup of parmesan
Salt & pepper

DIRECTIONS


In a large sauce pan melt your butter over a medium heat, once melted add in your flour 1 tablespoon at a time whisking the entire time until well combined. Add in your whipping cream next continually whisking, then add in your milk. Bring this mixture to a soft boil until it becomes thick then turn your heat down to low, then toss in the capers. Add in a decent pinch of salt and pepper.

Place your cooked noodles in your serving dish and coat with your cream sauce then top with your halved tomatoes and parmesan cheese.

Closer inspection. . . please disregard the messy bowl! Sometimes neatness is just not going to happen.

Tuesday, April 20, 2010

Sweet & Tart Rhubarb Muffins

Muffins for breakfast are good; this is a fact and not just a general statement from my mouth. So for years now a normal chain of breakfasts in my home would have been cereal, eggs, toast – rinse and repeat. Who new after baking just a few items I would always have muffin ingredients on hand. I had no idea how muffins were born, I just always imagined it being a really complicated process; thing is it isn’t. So I am now going to bake a breakfast at least once per week.

From last weekend when I baked pie’s I had one piece of Rhubarb left, so it would be the star ingredient in my muffins. So I need you to picture me baking these, I wake up bright and early about 6am on Sunday (always been an early riser). I tip toe down the stairs trying not to hit that one spot that makes the squeak heard round the word; I manage to miss it and I am free and clear as I head down the stairs. I start a fresh pot of coffee as soon as a get down there, a really nice French Roast; I bust out my mommy coffee cup and top my delicious cup with a little canned whipped cream. I am now ready to bake, but have to keep the decibels down for fear of waking the child. I managed to just finish them in the oven before dropping a bowl on the floor and disturbing her highness. I went up to fetch the little stinker and she jumped in my arms, she then promptly told the lamp “good morning lamp.”

She also ate a whole muffin to herself, me two, dad…three.


INGREDIENTS

For the muffins:

2 cups of all-purpose flour
3/4 cup granulated sugar
2-1/2 tsp baking powder
1 tsp ground cinnamon
1/2 tsp baking soda
1/2 tsp salt
1 cup sour cream
8 tbs unsalted butter, melted and cooled
2 large eggs
1 tsp vanilla extract
1-1/2 cupsdiced rhubarb

For the topping:

3 Tbs. granulated sugar
1/2 tsp ground cinnamon

DIRECTIONS

Preheat your oven to 400, line a muffin pan, or grease & flour, or parchment paper the bottom – so many options!

In a large mixing bowl, combine the flour, sugar, baking powder, cinnamon, baking soda, and salt and whisk to blend.

In a medium bowl, whisk together the sour cream, melted butter, eggs, and vanilla until smooth. Now you can stir the sour cream mixture into the dry ingredients. Mix with a spatula until the batter just comes together; remember to only incorporate until just mixed. Gently stir in the diced rhubarb. The batter will be thick, no worries though.

Fill your muffin pan and now lets make the topping, mix together your sugar and cinnamon. Top each muffin with a ¼ teaspoon of this mixture..or more if you like.


Bake at 400 for 20 minutes or so..enjoy with a wee pat of butter

Monday, April 19, 2010

Sunday

This is my weekend in pictures.

1030am - Up and ready, enjoying the sunshine in my backyard.


1035am – Sweet Bella, soaking in the rays herself


1045am – Can someone please hand me my baby?


1047am – Maybe I should specify the mood of the baby to hand over? Check out this ones bottom lip!


1050am – I know exactly what can solve this pouty look Indigo had going on…perhaps this will lighten her mood..


And nothing is better than a little flying with your daddy.


Any oh yes, that frown has been turned upside down.


And then there was my part of the day. .


The camera lady..and friend


And that was our weekend.

Friday, April 16, 2010

Bitter Chocolate Strawberry Brownies and stuff

Weather permitting this weekend I will be baptized. I am very excited to be taking this new path. I can not wait to see the changes that it makes within me and my surrounding life. I am already benefiting greatly having had my eyes opened to the simple pleasure of everyday tasks; that is completing little everyday things and doing them with a smile on my face. Not looking at them as if they are a thorn in my side, looking at them like little things I can do to bring god and my family pleasure.

Speaking of pleasure, I would like to list out a few things that pleased me over the week.

1. Fontina Cheese and Triscuits
2. Being able to run 2 miles without stopping
3. Having my daughter grab my face and my husbands, then making us smooch
4. LOST & Nurse Jackie
5. Finding a great coffee table from Overstock, 60lbs and only 2.95 for shipping.


Bittersweet chocolate, do you like it? If not then feel free to use the sweet stuff. I still had some left over strawberries that needed used as of last night; they were not getting any younger. I decided I was in the chocolate mood and went for brownies. There are so many different textures when it comes to brownies, the ones below pack a bitter bite of chocolate and have a punch of strawberry flavor.

INGREDIENTS

1 egg
1 cup of melted butter
1 tbs Vanilla Extract
¾ pound sliced strawberries
¼ cup pureed strawberries
1 cup sugar
½ cup cocoa powder
¼ cup bittersweet chocolate chips
1 ½ cups cake flour, in the end the batter should be between a cake & cookie consistency so add more if you have to

DIRECTIONS

First things first, preheat your oven to 350 and grease a smallish baking dish.

In a medium sized bowl whisk together your egg, melted butter, extract & pureed strawberry. In a larger bowl sift together your flour, sugar and cocoa. Toss your sliced strawberries and bitter chips into the flour mixture and mix in. Next add your wet ingredients into the dry and mix well. Pour into your dish and bake at 350 for about 40 minutes or until a toothpick comes cleanly out of the center.

These brownies pack a bitter punch but with a surprisingly cool strawberry touch.
Have a nice weekend.

Wednesday, April 14, 2010

Creamy Potato Soup with Sausage

There was a huge crisis averted last night, let me tell you. I was watching the first episode of Season 4, The Tudors. I love this show. Well half way through I get a message on my T.V. screen saying “Out of space, cannot record LOST”, I turned that channel so fast it would make your head spin and frantically erased programming so I could fit LOST on my DVR. I made it just in time too! I would have fainted had me and the hubby went to watch it this week and it wasn’t there! So crisis averted, you can thank me later dear husband.

Yesterday evening was also some great time with my Indy, she helped me pour ingredients for bread we were making and she really enjoys helping. She is at a truly great age, when she was a baby it always felt so one sided; meaning I gave way more than I got. Right now at 21 months she gives me so much in return I am barely worthy of her! Sorry to gush but I guess it is sort of my job, right?


Now on to my soup; do you ever find yourself tossing leftover potatoes? You know that bag that it is sitting in your cabinet waiting for you to forget about it….cringe. Well bust it out and make some soup, soup that you can enjoy leisurely for a couple of days and not have to worry about making dinner. This is a comfort soup for sure, nice & tasty and very filling. Made with motherly love and husband approved…even Indy had her share and you all know how Indy feels about moms cooking.

INGREDIENTS FOR SOUP, SERVES MANY…FOR A FEW DAYS…AT LEAST…UNLESS YOU’RE LIKE KING KONG.

2 cups onion, chopped
1 cup carrot, chopped
½ cup celery chopped
2 cups of cooked turkey sausage, I used Hillshire Farms.
6 cups potato, diced
3 cups of chicken broth
7 tbs of butter, 1 reserved for sauté of the vegetables
6 tbs of flour
5 cups of milk
2 cups of Swiss cheese, or any cheese you prefer

DIRECTIONS

Over a medium high heat in a very large pot sauté your onion, carrot, celery with 1 tbs of butter for about 5 minutes. Add in your sausage and potato next and sauté for another 3-4 minutes. Turn your heat down to a low setting and cover the pot let it all marinate for about 10 minutes. After 10 minutes add in the 3 cups of chicken broth and bring to a boil, then turn down heat and simmer while we move on to the next step.

In a large sauce pan melt 6 tbs of butter. With a whisk add in your 6 tbs of flour one at a time until combined. Now you can add in your milk slowly whisking the whole time, bring this mixture to a boil, you will notice it thickening. Remember to whisk, once the mixture is thickened you can add in your cheese and mix again.

The last step is to pour your milk mixture into the soup and mix well; let this simmer for about 10 minutes then take your potato masher and mash a little within the pot to create and even thicker soup.

You’re done, enjoy.

Monday, April 12, 2010

Stawberry Rhubarb Pie

Saturday was filled with Strawberries & Rhubarb. These are two of the most vibrantly colored specimen you can work with. I had only tasted Rhubarb once before, at least 6 years prior and I really couldn’t remember much except “I think I liked it!” I gave the Rhubarb a good ole sniff to try and predict the flavor but until this was baked into a pie I couldn’t have predicted its offbeat and quirky taste, and I mean that in a GOOD way. Rhubarb taste’s like Rhubarb, there is no other way to describe it; baked with the strawberries it makes for a perfectly pink pie. I made 2 of these pleasing pies and couldn’t be angrier that there wasn’t a 3rd.


I delightfully borrowed this from sugarcrafter, bravo lady great recipe!
http://sugarcrafter.net/2009/07/05/strawberry-rhubarb-pie/

INGREDIENTS FOR THE SCRUMTIOUS FILLING

2 cups of Sugar
2/3 cup of flour
3 cups of diced Rhubarb
3 cups of sliced Strawberries
1 tsp ground ginger

INGREDIENTS FOR THE CRUNCHY CRUMBLE

1 cup of flour
½ cup light brown sugar
½ cup of butter, softened

• You can use a store bought pie crust or make this one
http://indigosugarspectrum.blogspot.com/2010/04/pie-crust.html

DIRECTIONS


This is so easy. Dice the Rhubarb and slice the strawberries and place them in a large bowl.


Cover them with your sugar, flour & ginger; then mix. You will notice while we move onto the next step that the mixture will begin to get juicy.


Now for that crumble top, in a large bowl mix together your butter, flour & light brown sugar. You want a crumble consistency so the ingredients should not bind completely; it should be nice and fluffy.


Ready to assemble? I am.

Place the fruit filling into your pie crust.


Sprinkle the crumble on top of the pie filling.


Now we are ready to bake this pie for 40 minutes at 425, and a trick of the trade is to make a ring out of tin foil to protect your outer pie crust. Once those first 40 minutes are up remove the foil ring and bake for 10 more minutes. Always keep an eye on your pie, don’t want it to burn! I gave one of my pies just a slight owie due to the foil ring falling off!


Now I am going to do something terrible to you, you really have to wait to eat this pie. I know I know, but it really needs time to bind up and get all good and gooey. Just give it a few hours please.